Customer Support
TECHNICAL SUPPORT / FAQ's
Vista Broadband combines the power of microwave wireless and Ethernet over fiber optic technology to bring ultra-high speed and reliability to our business customers. Vista Broadband offers a wide range of solutions with symmetrical download and upload speeds ranging from 1 Mbps to over 10 Gbps!
Vista Data Sheet
 |
General Topics |  |
> Configuring your computer for Vista Broadband service (DNS, Default Gateway, IP, etc.)
|
• IP Addresses • Netmask • Default Gateway • DNS Name Server 1 • DNS Name Server 2 • Incoming Mail Server • Outgoing Mail Server |
192.168.254.100-199 255.255.255.0 192.168.254.1 206.176.250.54 206.176.240.54 pop.vbbn.com smtp.vbbn.com |
> How is Vista's wireless different from other wireless?
When the term "wireless" is brought up, most consumers think of the home based wireless products purchased off the shelf (also known as 802.11).
While such devices are indeed wireless, the class of equipment is far from the quality and power of that used by Vista to deliver the reliable and blazing fast Internet we are known for. Utilizing only carrier class microwave wireless equipment, Vista couples this reliable and powerful technology with years of WAN wireless knowledge and industry standard best practices brought by its technical staff.
> Does Vista offer other services?
Vista offers a number of other solutions to empower your business and provide you with key technologies to help ensure your success. Along with the core bandwidth offerings, Vista Broadband also offers services such as:
- DNS
- Web Hosting
- Streaming Media
- Online Backup Solutions
- Robust Collocation
- Event Internet services
- Consultation Services
Call our sales team at (707) 527-0545 to learn more about what we can do for you!
> What is Vista's technical support strategy?
Through continual proactive monitoring of Vista's infrastructure, our technical operations group work around the clock to ensure that your business stays connected. Utilizing state of the art monitoring software and equipment, each point of Vista's infrastructure is observed in real-time to identify potential issues early on and mobilize to circumvent any possibility of outages. To further reinforce the stability of your service, Vista offers its business class customers 24x7x365 days a year live support. Vista always takes the approach that we are not just your service provider, we are your company's extended WAN team.
With a 99.7% uptime commitment to your business, Vista's strategy is concreted in a operational model based on:
- Continual preventative maintenance
- Powerful, built-in multi-path failover for Vista's infrastructure
- Multiple upstream providers for Internet failover
- 24/7 year round real-time monitoring of the infrastructure
- 24/7 year round live technical support services
Through careful collaboration and planning, Vista's technical operations group can work with your business to bring reliable, fast Internet connectivity with powerful failover solutions.
▲ CLOSE WINDOW
> What is Symmetrical Internet and Why Does It Matter?
Internet service can be divided into two types of solution offerings; asymmetrical and symmetrical. These terms relate directly to the download speed and the upload speed of your Internet service.
Asymmetrical services, such as DSL and cable, are Internet solutions that offer a fast download speed with a much lower upload speed. Typically services of this type offer 2Mbps/300Kbps packages that are suited for the casual Internet user.
Symmetrical service, such as Vista Broadband, is an Internet solution that offers a matching download speed and upload speed. This becomes very important to your business when you:
- Use voice over IP (VoIP)
- Transfer large files to remote computers (FTP)
- Send large emails regularly
- Rely on online backup solutions
- Use VPN's
- Require streaming media services
Vista's infrastructure and services are specifically engineered for business use so that your company is empowered to move forward and meet the demands of an ever evolving market place.
▲ CLOSE WINDOW
> How Does VoIP work in relation to your service?
Vista's infrastructure is engineered to meet the ever growing bandwidth and quality of service demands essential for a business to continue growing and stay competitive in today's market.
VoIP (Voice over IP) has become a powerful communication medium over Ethernet that is an exciting alternative to the limitations of conventional telephone services. Vista's network offers Voice over IP users a super highway of bandwidth that allows VoIP to work seamlessly as businesses deploy the technology for their use. By offering low latency within Vista's network, unhindered operation of VoIP through lenient port policies and powerful "VoIP friendly" symmetrical Internet services, Vista's infrastructure can easily handle the demand for reliable and quality VoIP operation.
 |
 |
> Domains (www.yourname.com) Incoming and Outgoing mail server information
> How do I set up my email for Microsoft Outlook?
1. Open Outlook.
2. Select Tools > E-mail Accounts.
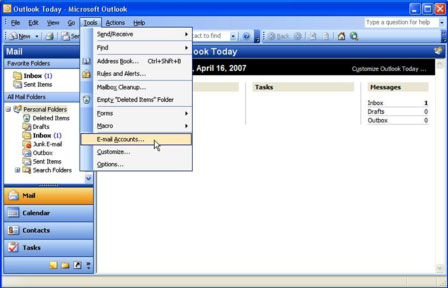
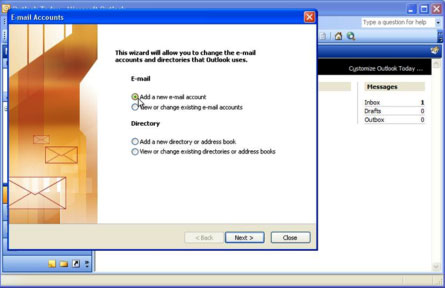
3. Select "Add a new e-mail account".
4. Click the "Next" button.
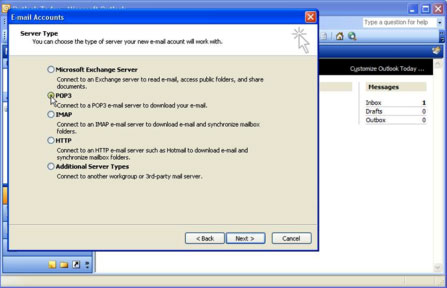
5. Select POP3 as the Server Type.
6. Click the "Next" button.
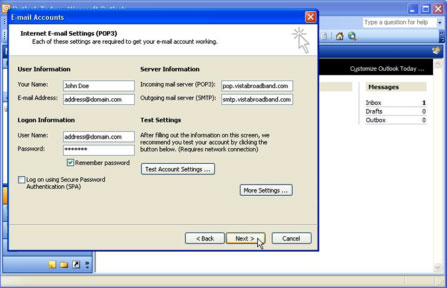
7. Enter your name as you wish it to appear in your emails.
8. Enter your entire email address.
9. Enter "pop.vbbn.com" as your Incoming mail server.
10. Enter "smtp.vbbn.com" as your Outgoing mail server.
11. Enter your entire email address as your User Name.
12. Enter your password, and select "Remember password".
13. Click the "Next" button.
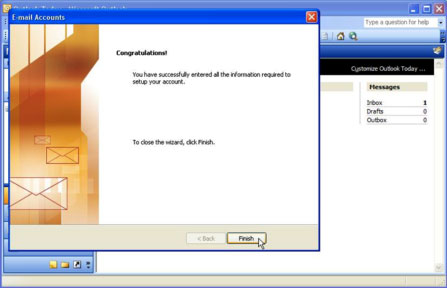
14. Click the "Finish" button.
▲ CLOSE WINDOW
> How do I set up my email for Microsoft Outlook Express?
1. Open Outlook Express.
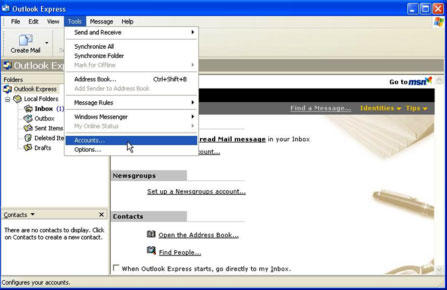
2. Select Tools > Accounts.
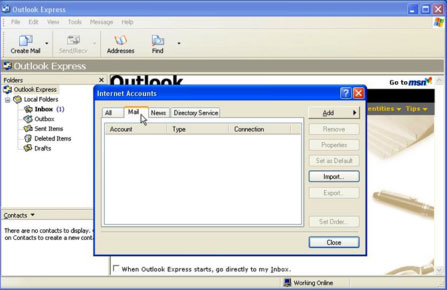
3. Click the "Mail" tab
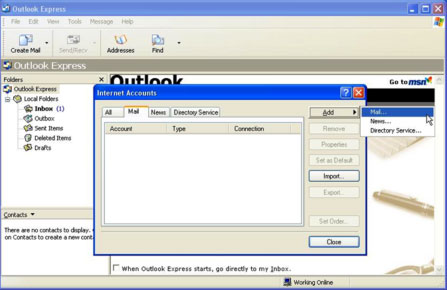
4. Click the "Add" button, select "Mail…"
5. Enter your name as you wish it to appear in your emails.
6. Click the "Next" button.
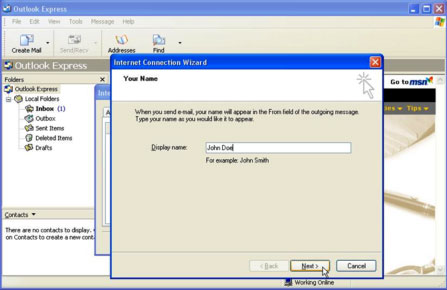
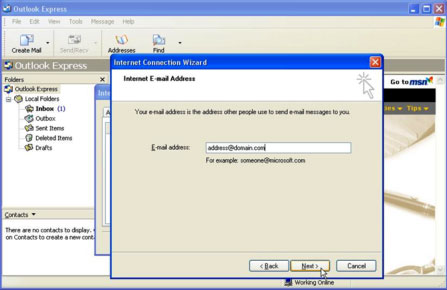
7. Enter your entire email address.
8. Click the "Next" button.
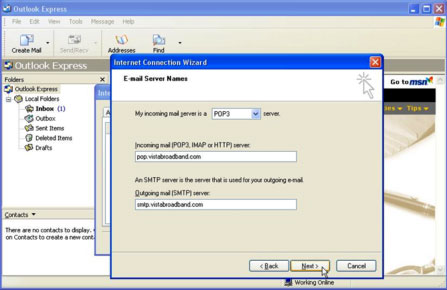
9. Select "POP3" as your server type.
10. Enter "pop.vbbn.com" as your Incoming mail server.
11. Enter "smtp.vbbn.com" as your Outgoing mail server.
12. Click the "Next" button.
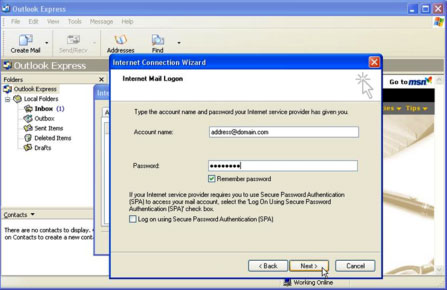
13. Enter your entire email address for your Account name.
14. Enter your password.
15. Click "Remember password".
16. Click the "Next" button.
17. Click the "Finish" button.
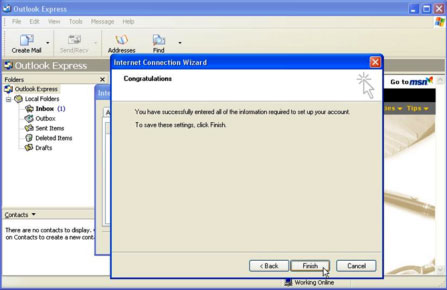
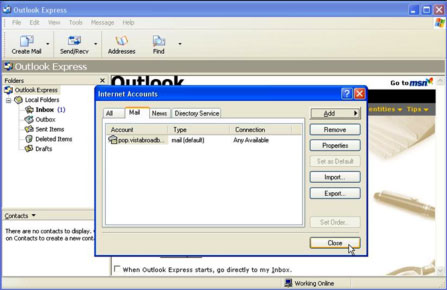
18. Click the "Close" button.
▲ CLOSE WINDOW
> How do I set up my email for Mozilla Thunderbird?
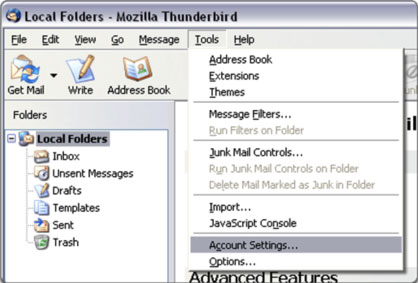
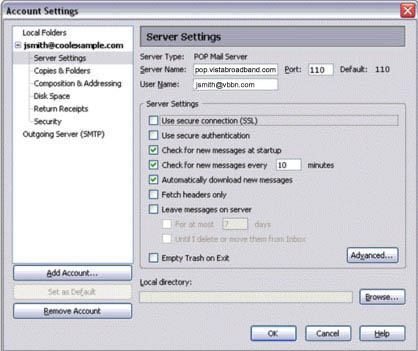
1. In Mozilla Thunderbird, select Tools > Account Settings.
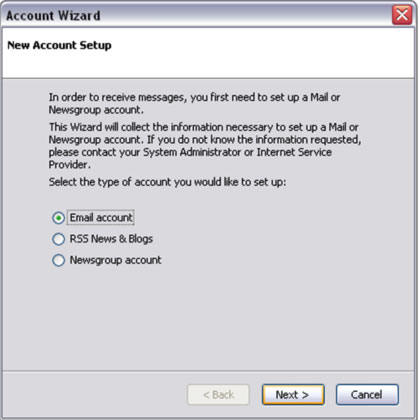
2. Select "Email account" and click Next.
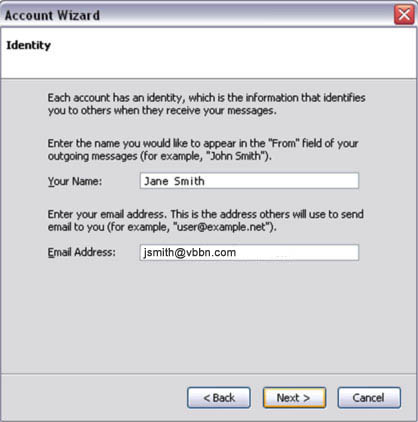
3. Enter your name and e-mail address.
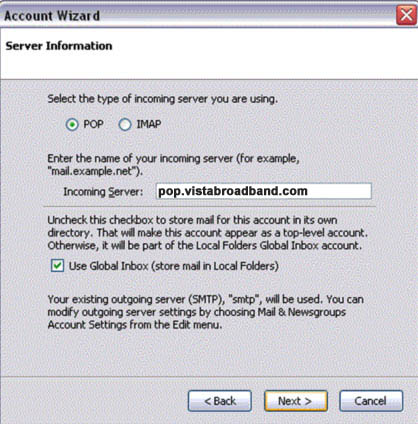
4. Select "POP" as the type of incoming server you are using.
Your incoming server is pop.vbbn.com, click "Next".
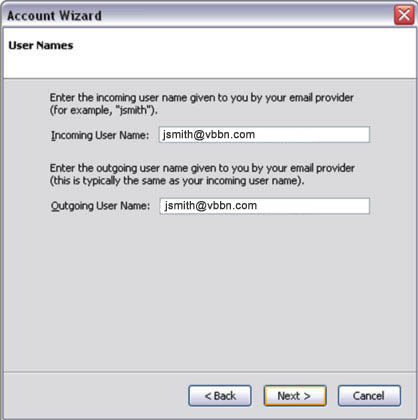
5. Enter your e-mail address for the "Incoming User Name," and
"Outgoing User Name.", click "Next".
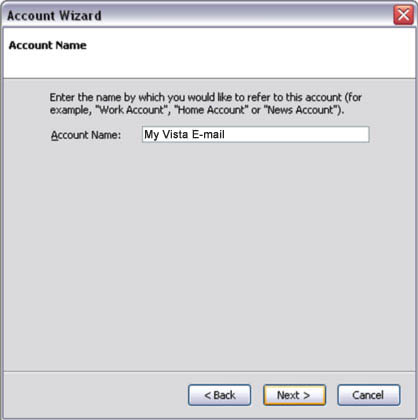
6. Enter a name for your e-mail account and click "Next".
7. Verify your account information and click Finish.
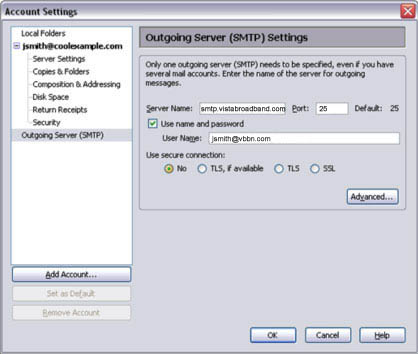
8. In the Account Settings window, select "Outgoing Server" listed below your new account.
9. Enter "smtp.vbbn.com" for the "Server Name" and change the "Port" setting to 25.
10. Select "Use name and password" and enter your e-mail address.
11. Thunderbird will ask you for your password the first time you try to send mail. Click OK.
▲ CLOSE WINDOW
> How do I set up my email for Mac Mail?
1. Go to Applications.
2. Open Mail.
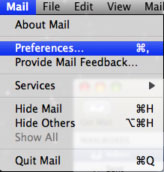
3. Select Mail > Preferences.
4. With Accounts selected at the top of the screen, click the + button in the bottom left corner to create an account.
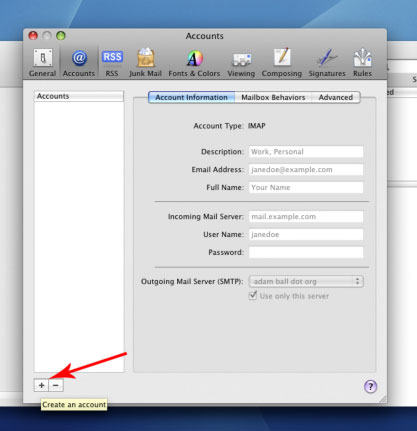
5. Enter your name as you wish it to appear in your emails.
6. Enter your entire email address ([email protected])
7. Enter your password.
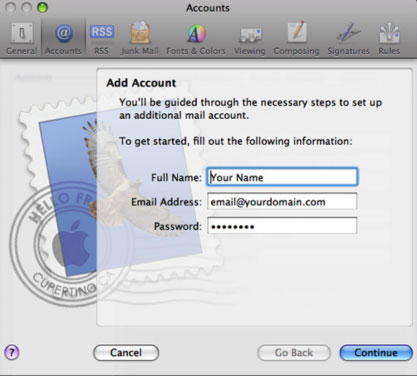
8. Click the "Continue" button.
9. For Account Type, select POP.
10. For Account Description you can specify what kind of account it is, home, work, or your name, or just leave it blank.
11. Enter "pop.vbbn.com" as your Incoming mail server.
12. Enter your entire email address as your User Name ([email protected])
13. Enter your password.
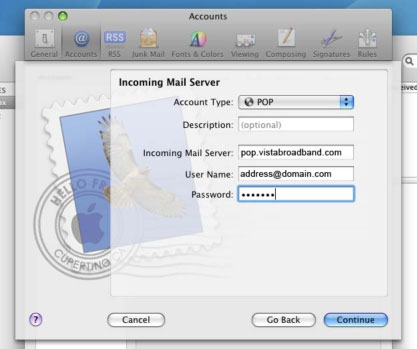
14. Click the "Continue" button.
15. For Account Description you can specify what kind of account it is, home, work, or your name, or just leave it blank.
16. Enter "smtp.vbbn.com" as your Outgoing mail server.
17. DO NOT check the "Use Authentication" box. Leave everything below this box empty.
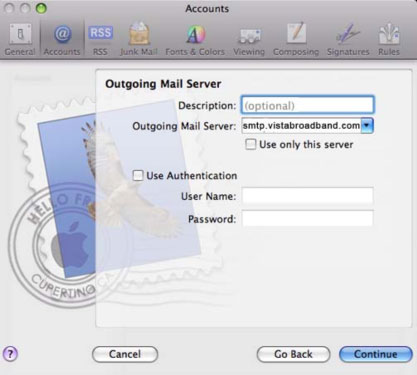
18. Click the "Continue" button.
19. The last page will outline your Account Summary. Check and make sure everything is entered correctly.
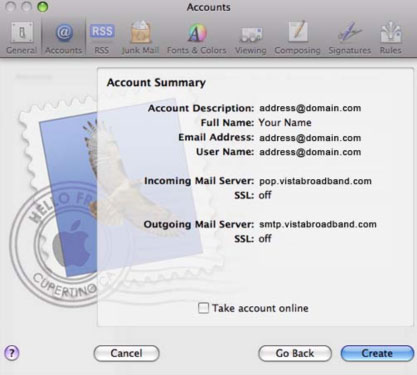
20. Click the "Create" button.
▲ CLOSE WINDOW
> How do I use the WebMail interface?
1. Open any web browser (EXAMPLE: Internet Explorer or Firefox).
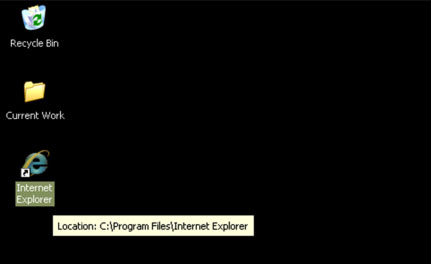
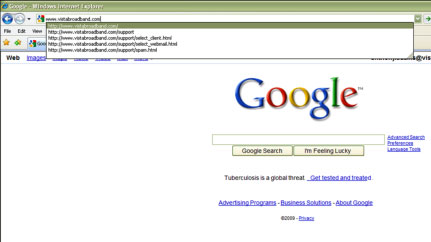
2. In the URL field type: www.vistabroadband.com
Note: Alternatively you can just type in http://webmail.vbbn.com/
to go directly to the WebMail page.
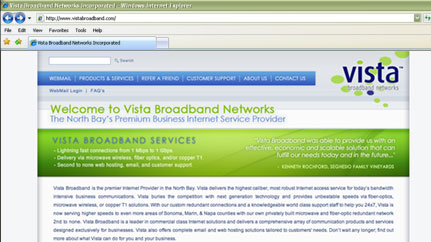
3. At the Vista Broadband Home Page click on the WebMail link located on the upper left.
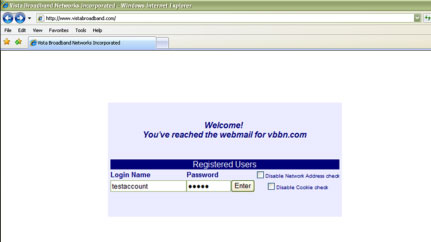
4. Under Login Name type in your email name.
For example if your email is [email protected] your login name will be testaccount.
The example below shows your email home page upon first login. There are a number of different features that you can use from here, all of them listed numerically below.
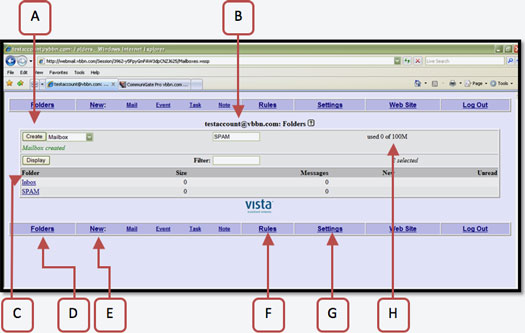
(A) CREATE:
The Create button allows you make new folders within your mailbox. As shown above, a folder called SPAM has been created. The drop down menu allows you to create a number of other items in your email as well such as:
- Address Book
- Calendar
- IPF.StickyNote
- Tasks
To create a new folder, you would simply make sure that "Mailbox" is selected in the drop down menu, type the name of folder you wish to create and click the "Create" button. Your new folder will be listed under the "Folder" area.
(B) EMAIL ACCOUNT:
This area simply shows which email account you are currently logged into, a useful bit of information if you work with multiple email accounts.
(C) FOLDER LIST:
The "Folder List" displays all folders you currently have in your email account such as Inbox, SPAM or any other personal folders you may have created. Each folder is then follows by certain information about it such as:
- SIZE – How many Megabytes (or how much space) that folder is taking up. It's directly related to how many messages are in that particular folder, how big each message is and adds them all together to give you the total size. This is especially helpful if you are running low on mail storage space and need to free space up. You can look at the size of each folder and go in to clean up ones that seem a little excessive in size.
- MESSAGES – Shows how many mail items/messages are in that particular folder.
- NEW – Shows how many new mail items are in that particular folder.
- UNREAD – Shows how many messages are unread within that particular folder. This will also count messages that you may have missed and remain unread despite the time that has passed since you've received it.
(D) FOLDER LINK:
The Folder Link is used to be able to get back to the Webmail Homepage. For instance, let's say that you have clicked on the Settings link and would like to get back to the homepage – you could simply click the "Folder" link from where you are to return there.
The "Folder" link, including a number of other links, stay constant on your screen so that you can navigate about Webmail by clicking on them.
(E) NEW LINK:
This area of Webmail is used to create new mail or mail related items. Clicking on the "New:" link will automatically create a new email message for you. Alternatively you can click the "Mail" link to create a new message as well. Other links (listed below) perform the same function, each creating a mail related items according to its name.
| LINK | DESCRIPTION |
| Generates a new mail message to send. | |
| Event | Generate new events on your Webmail Calendar. You can also send these events to other people's email. Events are used in the same manner as a day planner or day runner. Creating an Event will auto-create a Calendar folder for you in your Folder List. |
| Task | Much like creating events, clicking this link takes you to a page to create a task that you can either use for yourself or email to other addresses. Tasks can be used to track the progress of a small project or task over a time period you define. Creating a Task for the first time will auto-create a Task folder for you in your Folder List. |
| Note | Clicking the Note link will allow you to create a small note (think of it as a virtual Post-It). Notes also carry the benefit of being able to have attachments with them. For instance, you can create a note regarding a vendor and type your comments, then attach the vendor's digital invoice to it for reference. Creating a Note for the first time will auto-create a Note folder for you in your Folder List. |
(F) RULES:
Rules are a handy tool that allows you perform a number of predefined auto-executed actions based on how you set up a rule. An example of this would be a rule that you setup so that any email that comes to your inbox that is from your friend [email protected] is automatically sent to a folder you created called Larry's Emails instead of the inbox.
For more information about setting up rules, see our
support topic "Setting Up Rules in Webmail".
(G) SETTINGS:
This page is responsible for a number of settings relating directly to your Webmail interface and local settings.
For more information about using Settings, see our
support topic "Using Settings in Webmail".
(H) MAIL STORAGE USAGE:
This numeric ratio shows the amount of space you have used of your total mail storage. It's very important to pay attention to this information. Once your mail storage has been used up, emails sent to you thereafter will be rejected until you make room in your mail storage or upgrade your storage service for a larger amount of space.
For more information about freeing up email space, see our
support topic "Good Email Practices".
For more information about increasing your storage, see our
support topic "Increasing you Email Storage".
▲ CLOSE WINDOW
> How to use Spam Filtering
If you enable this feature any messages that our system believes are spam will not be downloaded onto your computer, instead they will be stored in a special SPAM mailbox on our system. To view these messages you will have to log on via webmail.
Any messages older than 10 days will automatically be deleted from your SPAM mailbox.
Follow the instructions below to enable spam filtering for your account:
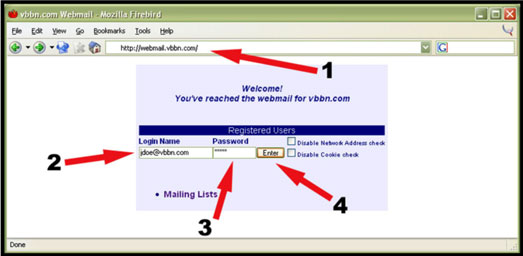
Logging on to Webmail
1. Using a web browser, go to the address https://webmail.vbbn.com/
2. Enter your email address into the Login Name field.
3. Enter your email password into the Password field.
4. Click on the Enter button.
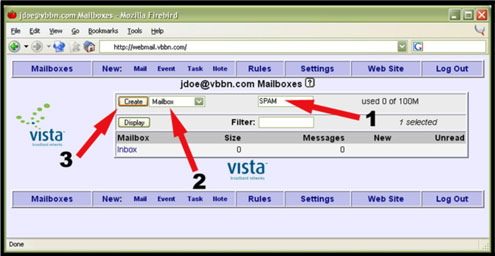
Creating Your Spam Mailbox
1. Enter the word SPAM into the box marked by arrow number one above. Make sure you enter the word using all uppercase characters.
2. Make sure the pull-down marked by arrow number two is set to Mailbox - this should be the default.
3. Click on the Create button. This will create a mailbox called SPAM where all you suspected spam messages will be filed.
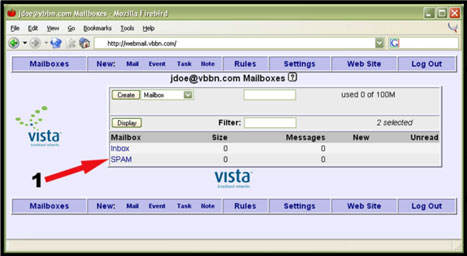
Viewing Your Spam Messages
1. Click on the mailbox SPAM in your list of mailboxes.
2. Once you've entered your spam mailbox you can transfer any messages you wish to download to your Inbox, or delete any unwanted messages. Please Note: any messages older than 10 days will be automatically deleted from your spam mailbox.
▲ CLOSE WINDOW
> Setting Up Rules in Webmail
> Using Settings in Webmail
> Good Email Practices
Good email habits are a must for ensuring that your email service experiences little to no problems. Following these tips and guidelines can result in a happier, trouble free email experience.
- NEVER give your password out!
- ALWAYS save attached files in an email that you are expecting and from a known sender to your computer. This helps free up space in your email account.
- NEVER respond to SPAM. More times than not, it will only result in more SPAM being sent.
- ALWAYS schedule some time to scan your SPAM folder for legitimate messages. Our SPAM filters are very accurate, but there are those rare occasions when legitimate emails will get flagged accidentally.
- ALWAYS clear out your SPAM folder on a regular basis. This helps free up space in your email account.
- ALWAYS clear out your trash folder on a regular basis. This also helps clear up space in your email account.
- ALWAYS double check the email address you are sending to is correct. More times than not, complaints that come to us regarding undeliverable is a result of mistyped email addresses.
- ALWAYS clear out old and unneeded email.
▲ CLOSE WINDOW
> Increasing your Email Storage
So you've come to realize that your current mail storage size just isn't cutting it and you are wondering if you can increase your email storage with Vista Broadband. The short answer is: absolutely!
Email storage sizes run in increments of 100MB, 300MB and 1GB. Getting your email storage increased is extremely fast, painless and affordable. Your increased storage will take effect almost immediately and the cost will automatically be added to your monthly bill for service. Call us for pricing! (707) 527-9475
 |
Domains |  |
> How do I acquire a domain?
Domain hosting through Vista Broadband is always great practice for your business needs. Vista Broadband's talented array of technical staff work diligently to ensure absolute rock solid service when it comes to your domain.
However, the process for domain hosting starts with you. Registering a domain name with a domain registrar is the first and most necessary step towards using our hosting service.
Vista Broadband recommends www.godaddy.com for acquiring a domain name.
Once you've acquired your domain, call our support staff at (707) 527-9475 and we will help you take the next steps to getting your domain hosted through our service!
> Administrating your domain's email accounts
Entering the Admin Interface
1. Using a web browser go to http://mail.yourdomain.com:8010/. For example, if your domain name was acme.com you would go to http://mail.acme.com:8010/
2. Click on Enter to go to the admin interface. When prompted, enter postmaster as your username and enter the password supplied to you as the password.
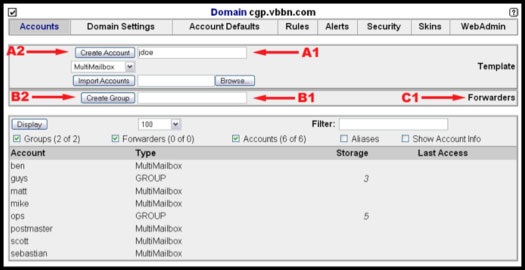
3. Once you've correctly entered a username and password you should be at the main accounts page - as shown below. Scroll down for instructions on performing basic tasks such as adding and deleting users.
Adding an Account
1. Type the username for the account (the part you want to the left of the @ in the persons email address) into the box marked by arrow A1.
2. Click the Create Account button, marked by arrow A2. This will to take you to the account settings page where you can set options, including the password, for an account.
3. Click here to go to instructions for the account settings page.
Deleting an Account
1. Click on the account you want to delete, then proceed to the account settings page for further instructions.
Renaming an Account
1. Click on the account you want to rename, then proceed to the account settings page for further instructions.
Creating an Account
A group is an email address that allows mail to be sent to multiple recipients through a single address. For example; you could set up a group called sales and add all your salespeople to the group. When email is sent to [email protected] all your salespeople will receive the message.
Type the name of the group you want to create in the box marked by arrow B1. Then click on the Create Group button marked by arrow B2. This will take you to the Group Setting page: Click here to go to instructions for the Group Settings page
Adding a forwarder
A forwarder is an address that you want to forward directly on to another address, forwarders are generally used for addresses where someone will never need to log in to your mail server.
1. Click on the Forwarders link marked by arrow C1. This will take you to the Forwarders page.
Click here to go to instructions for the Forwarders page.
▲ CLOSE WINDOW
> Administrating your domain's website
 |
Internet Speed & Service |  |
> How do I check how fast my Internet is?
When running your speed test remember the following:
1. Running a speed test over WiFi will not provide accurate results.
2. You must run a speed test at Vista's PoE injector where our service first comes in.
Remember that you can always contact our friendly local support team at 707.527.9475 for help on how to run a speed test.
General Internet Speed Tests
http://www.speedtest.net/
http://www.speakeasy.net/speedtest/
> How can I increase my speed?
Service with Vista entitles you to many great benefits that you would not find at other ISP's. One of these is the ability to increase your speed through a simple phone call that takes place immediately!!
As a customer you are empowered with the ability to contact Vista Broadband's Technical Ops department and request an upgrade to your speed – a change that takes place almost immediately.
(Pricing can be acquired over the phone for increases/upgrade. (707) 527-0545
> Can I increase my speed temporarily?
Yes, Vista Broadband offers a great amount of flexibility to meet your temporary bandwidth needs. If you find that you will need to increase your bandwidth temporarily to accommodate an event, seminar or operations for a short time, simply call Vista and inform our staff of your bandwidth needs along with the duration of time for the increase. The change can happen almost immediately upon agreement over the phone, or you can schedule your increase to take place after hours. Pricing can be acquired over the phone for increases and/or upgrades to your service by calling Vista at (707) 527-0545
 |
Basic Troubleshooting |  |
> My Internet Speed is slow, how do I fix it?
Slow Internet can be attributed to a number of factors. It's always best to start right at your own network to understand what may be happening to cause slow service. Here are some tips and general "check-up" pointers that may help you restore the speed of your Internet:
Do you have multiple downloads active?
Heavy bandwidth usage can naturally choke Internet speeds. Multiple streaming videos and downloading multiple torrents are just a couple of things than might be causing slow Internet service.
Your bandwidth is similar to a freeway, the more cars you put on the road – the more congestion which inevitably results in slow downs. Try to locate large downloads or streaming media. Who else is on your network that might possibly be using large amounts of bandwidth?
Is your Internet consistently slow?
If you find that your Internet connection is slow all the time, it may be time to upgrade your Internet solution with Vista. Adding new services to your network, such as video conferencing or VoIP, can be a problem for bandwidth that isn't properly scaled to meet the demand of such technologies.
If your Internet was once adequate for your everyday use and has suddenly become problematic, ask yourself what new services might be affecting it? Calling our support staff, (707) 527-9475, can also help you determine how and where the bottleneck in Internet performance is occurring.
Have you tried rebooting your own network devices?
Often we find that a customer's equipment is the culprit in either slow Internet performance or unreliable connectivity. You might be able to quickly remedy a deficient Internet connection by restarting your own equipment by unplugging the power and plugging it back in.
Spyware, Malware and Viruses
Over time malicious software can build up even with software installed that protects your computer. As they build up they begin to consume more and more of your system and network resources until you are quite literally at a crawl with your Internet performance.
The first step a customer should take is to update to the latest definitions for their anti-virus, spyware and malware programs and then run scans. Vista recommends regular check-ups by a professional technician to ensure a clean and healthy system.
▲ CLOSE WINDOW
> My Internet Connection is no longer working, what can I do?
Check your cable connections
- Are all network cables appropriately plugged in? Check to make sure that you at least have a network cable connection from the center of the Vista wall box to your router, switch or computer.
- Check your power connections. Is everything plugged into a known good power source? Are all the connections properly plugged in?
- Try reseating your network and power connections by unplugging and plugging them back in.
Check your Power Source
- Make the sure power strip, UPS or wall outlet is providing power. Check to make sure power strips and UPS's are turned on.
- If you are not getting power to your Vista wall box, try plugging it into a different power source to rule out any faulty power strips or outlets.
Reboot your Router or Switch and Computer
- Try rebooting your router or switch. Many times these devices will lock up or begin to perform slowly over time and simply need to be reboot to refresh the device.
If you are not able to remedy your connection problems using these steps, contact Vista Broadband Support at (707) 527-9475
▲ CLOSE WINDOW
> I am unable to run certain online applications (ie: FTP, Remote Desktop Protocol, etc.)
Typically problems with running services such as FTP, Remote Desktop Protocol and such are related to incorrect configurations of a customer's personal firewall.
While Vista Broadband takes a very active approach to monitoring and securing our infrastructure, we do not impede or block standard ports that the majority of our customers use on a daily basis.
Our Technical Ops staff highly recommends consulting the manufacturer's technical reference manual for properly configuring port forwarding on your network device.
> My mailbox is full / I'm receiving a "mail box is full" error, what do I do?
Vista Broadband encourages customers to actively maintain their mailbox. Regularly clearing out SPAM, trash and unwanted mail will help avoid any problems with reaching your maximum storage.
If you find that within your email client (such as Outlook) you have cleared out just about everything you can spare to part with, but are still receiving errors, you will need to log in to your webmail account from the Vista Broadband website to remove unwanted SPAM and trash taking up valuable storage space.
NOTE: When you delete SPAM, it sends it to your trash folder which still counts towards your total mail storage. You will need to also delete the SPAM messages from the trash folder.
If you have removed all unwanted mail and are still receiving "Mail box is full" error messages, it may be time to increase the size of your mail storage. The default storage size for customers is 100MB with optional upgrades for 300MB and 1GB. Call for pricing!
> The emails I have sent have bounced back to my inbox, what does that mean?
Bounced email messages are ones that a have been rejected by the recipient, the recipients domain or mail server. Try asking yourself these questions when you receive bounced or blocked emails:
Is the email address I am sending to really correct?
Often enough a typo is the problem with a bounced email address. Check the email address and verify it's absolutely correction. Try contacting the recipient of your email message and have them confirm the address is in fact correct.
Are these emails one that I've sent?
Your computer may have fallen victim to viruses and other malicious software that is responsible for sending out messages without you knowing or your approval. If you find that strange messages are being returned to you that you know you have not sent, contact a professional technician to come out and check your system.
Have my mail settings changed? Are they correct?
If you have recently migrated to using another computer, or have purchased a new system, check to verify that your mail server settings are correct in your email program/client (see topics under "Email" for more details).
What do I need to provide Vista for technical support on this?
This is a very important one. Email can be a very tedious and intense troubleshooting process. With thousands and thousands and mail being sent through our servers each day, it is hard for us to locate what your specific issue is without being provided with the necessary information. When calling into Vista for support on your email, try to provide the following information:
- Your account name and email address
- The date of the email in question
- An attached copy of the email that you can send to [email protected]
▲ CLOSE WINDOW


